

Almost two years ago I placed a post on the blog detailing the service and repair of a vintage Favre Leuba chronograph that I’d purchased from an antique dealer. I commented at the time that I had become aware of the Favre Leuba brand when I read about their “Bivouac” model which had the ability to inform the user of his or her altitude in addition to the time. Today I’m happy to be able to tell the story of my Favre Leuba Bivouac, which I’ve been working on for the past three years.
For a little background information, Favre Leuba is a Switzerland based watch manufacturer with a history dating back to 1737. They’ve manufactured all kinds of timepieces through the years but are primarily known today for their Bivouac and Bathy 50 wristwatches. Both of these models were introduced in the early 1960’s and took the idea of a “tool watch” to extreme.
By the early 1960’s watch enthusiasts had already been introduced to dive watches, pilot watches, and watches for auto racing. These “tool watches” appealed to the men and women with an active lifestyle. Favre Leuba recognized the growing market and developed the Bivouac specifically for the outdoorsman.
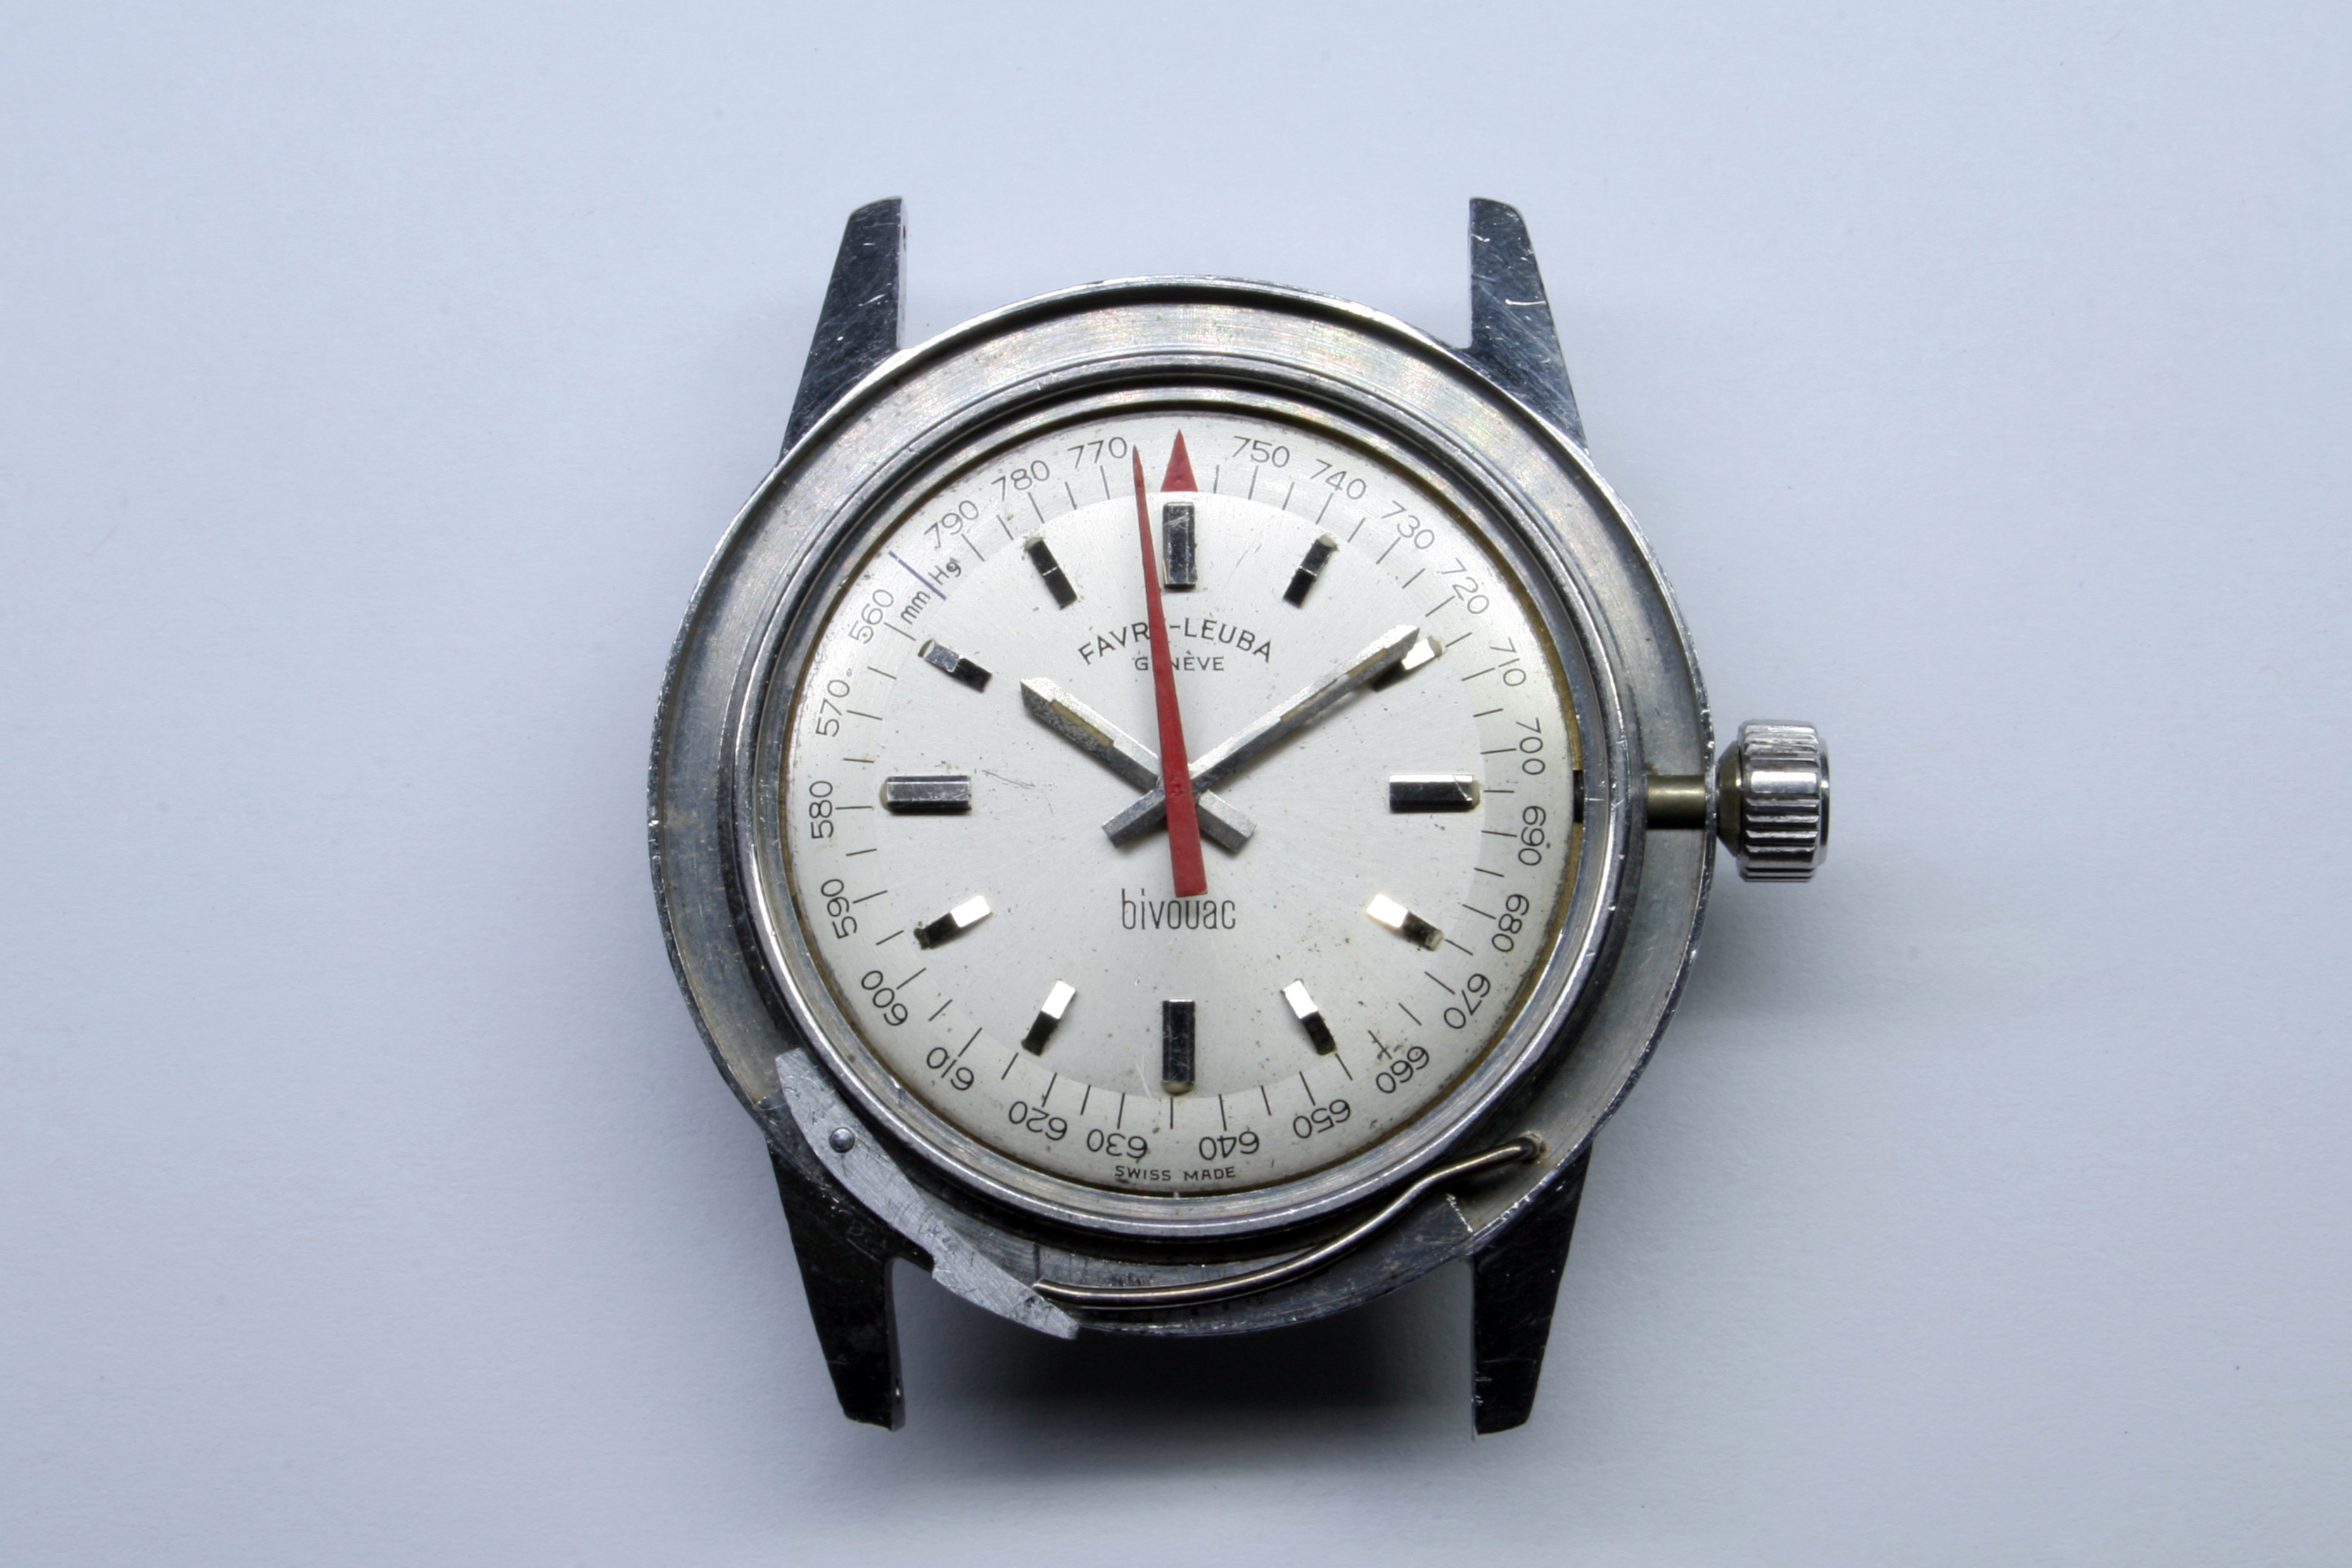
From an horological perspective the design of the Bivouac was very straight forward- just an hour and minute hand to deliver the time. However, inside the case the manufacturer also squeezed in an aneroid barometer capable of displaying atmospheric pressure up to 790 millimeters of mercury. This coupled with a rotating bezel with graduated scale turned the Bivouac into an able altimeter.
I began my hunt for the Bivouac after discovering my most desired tool watch, the Abercrombie & Fitch Seafarer, had rocketed out of my price range. This left me a bit blue as I’d been pining for a Seafarer for over a decade but when given time to reflect on it, the Bivouac seemed to be an ideal alternative.
I therefore set out to find a Bivouac in serviceable condition. As usual, I wasn’t looking for the perfect specimen but rather I wanted to find a watch that needed a little TLC which would afford me an opportunity to pick around the insides.
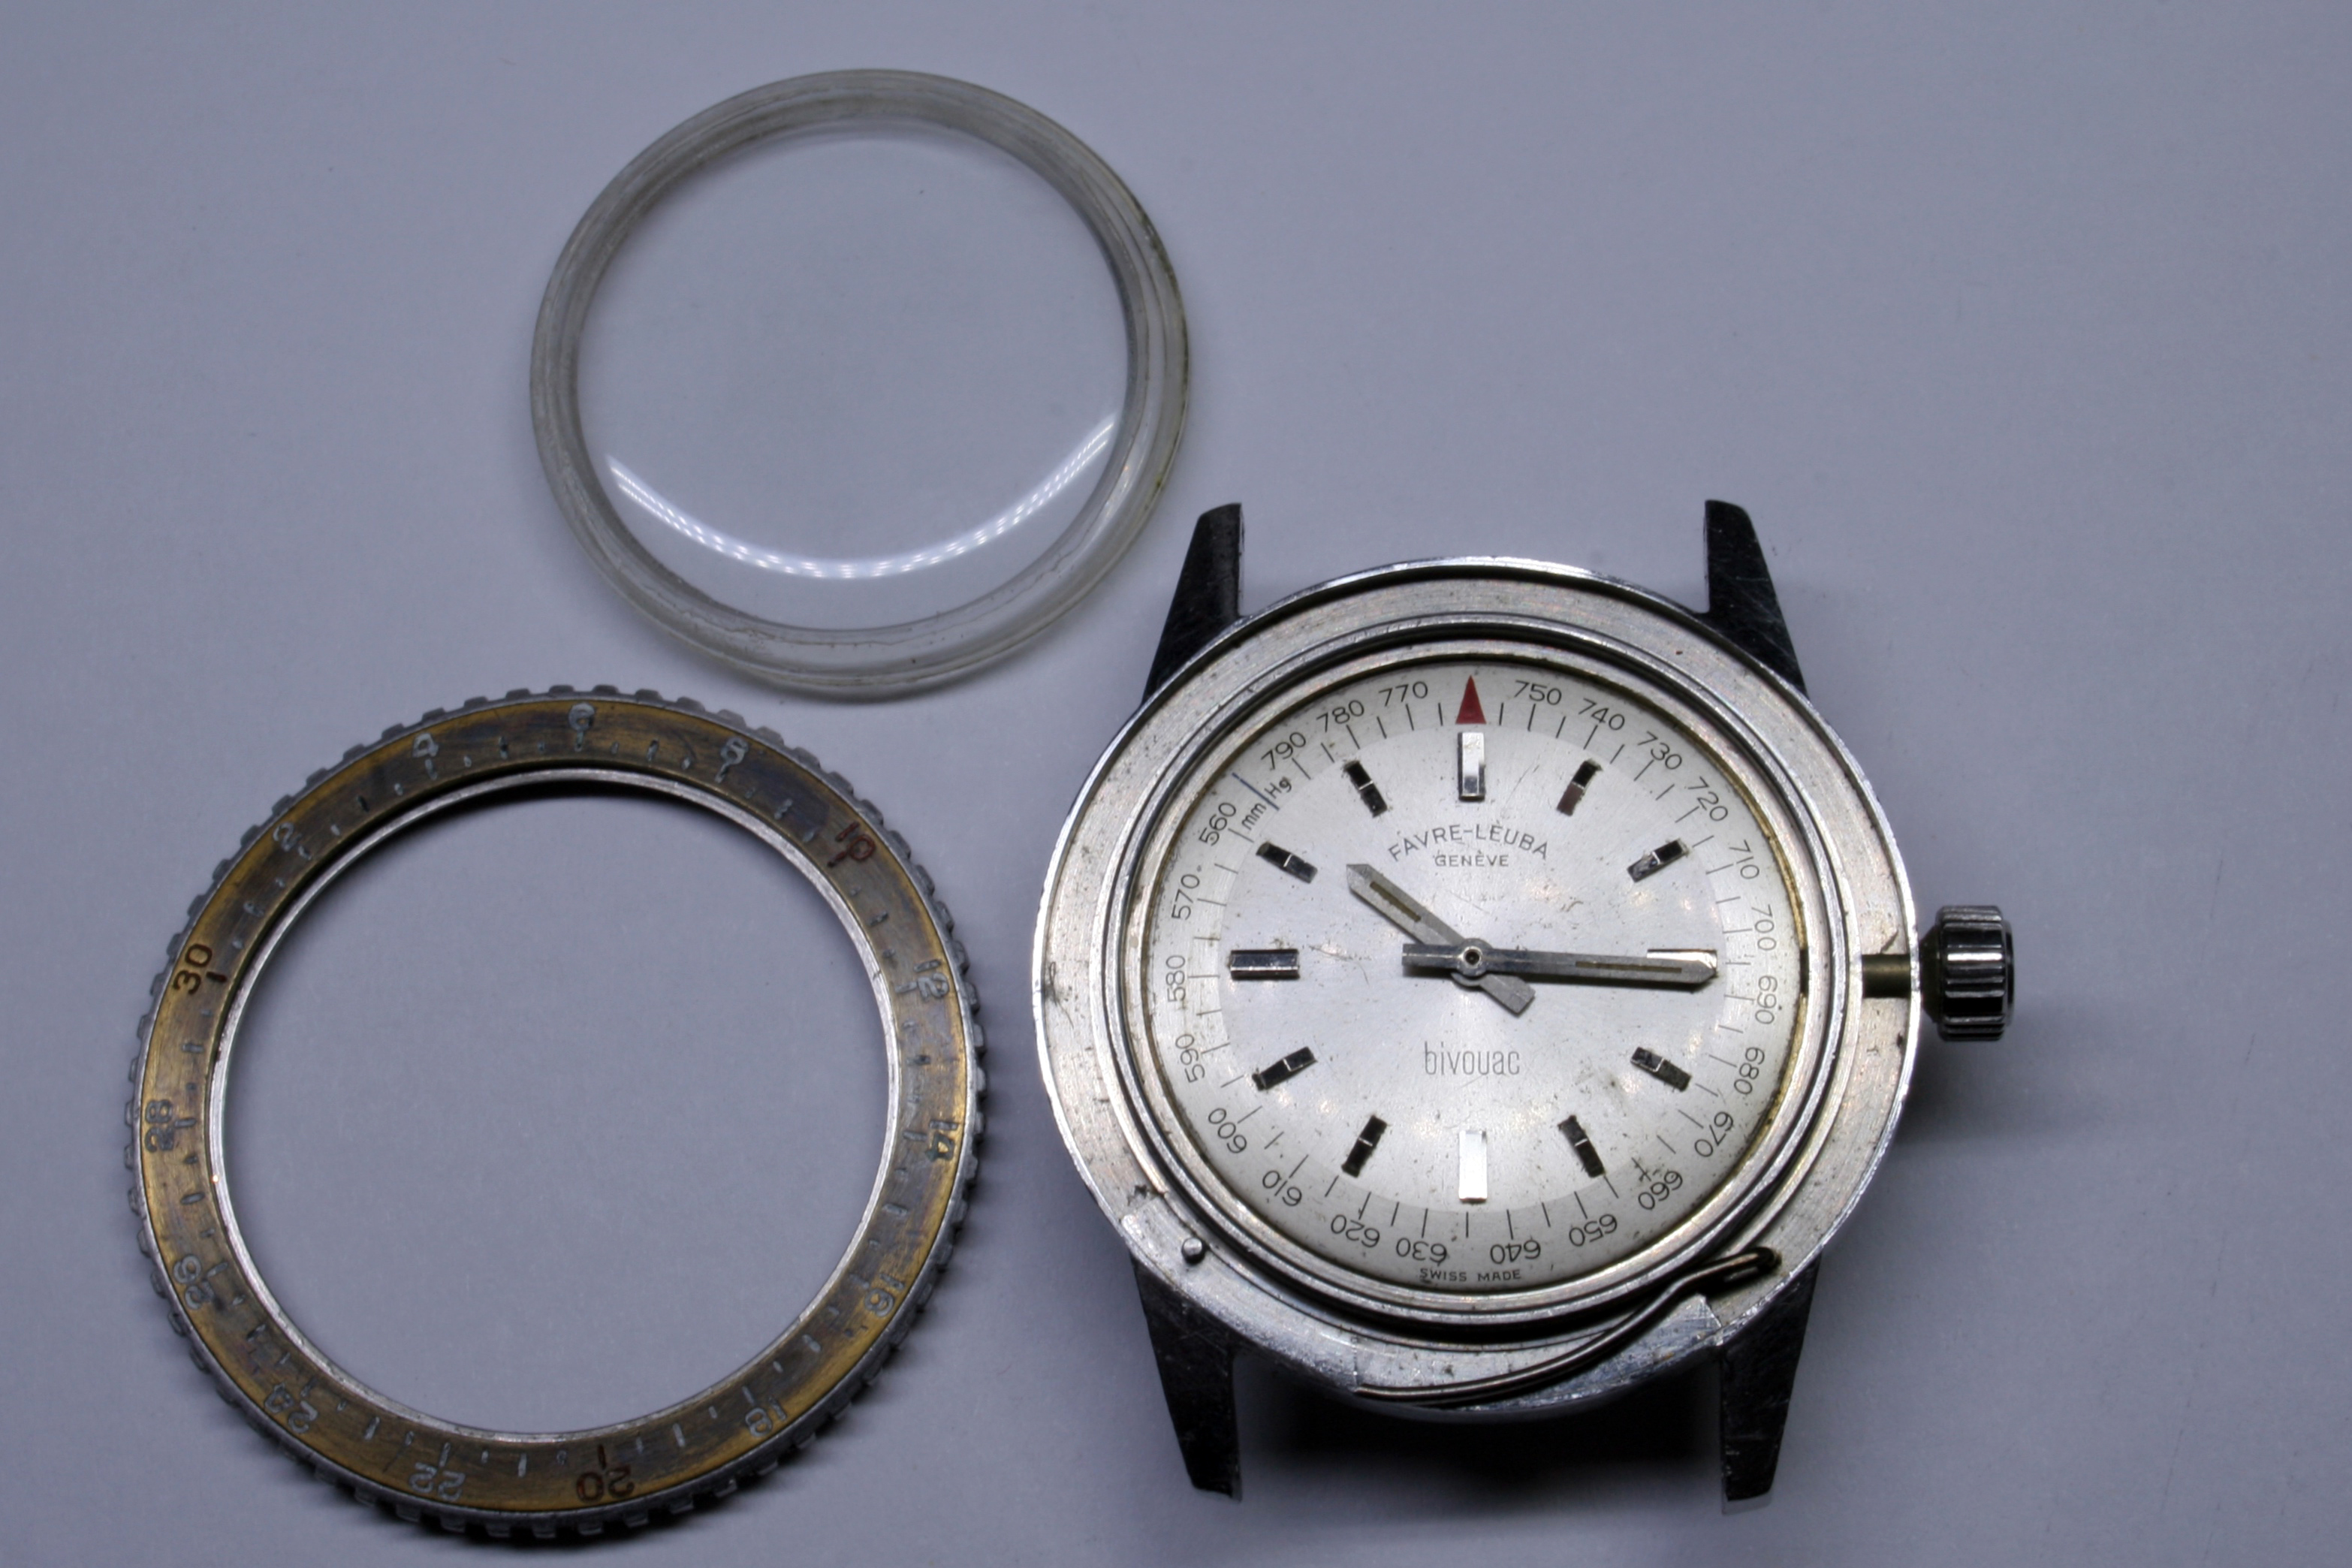
 I found on eBay this Bivouac with a Buy-it-Now option that was reasonable but the piece did have issues requiring attention. As the seller stated in the description, the crystal would not remain seated and the red barometer hand was loose but appeared to function properly. The condition of the bezel was concerning too but otherwise I felt the deal was sound.
I received the piece it working order but discovered immediately that the issue with the crystal was a little more grave than initially believed. True, as the seller stated the acrylic crystal wasn’t a tight fit, but what I didn’t know was the fact that the crystal secures the bezel to the case; if the crystal won’t stay on then the bezel won’t stay on either.
Thus was my introduction to the first hurdle- finding the correct crystal.
I downloaded the entire Sternkreuz crystal catalogue from Cousins to search for an acrylic crystal which had a lip running the circumference for the purpose of securing the bezel; alas, none were to be found. Understanding this challenge might be a great one, I set it aside in my mind and moved onto servicing the movement.
Immediately I was confounded by a new challenge- how to safely remove the barometer!

The Caseback came away easy enough following removal of the retaining ring; however, beneath the Caseback was a conundrum. I could clearly see the Aneroid Capsule which was seated in a brass bracket, but I couldn’t figure out how to remove the bracket.
I turned to the internet for help but found a dearth of information on servicing a vintage Bivouac. Digging deeper, a bit of useful information was located on the Omega forums. These forums are dedicated primarily to Omega timepieces and the owners of said timepieces but there are a few subforums dedicated to other watches. In one of these I found a thread which provided me an answer.

A friendly forum member had uploaded a service worksheet for the Bivouac watch. I would need to brush up on my French but once I’d done so it was clear that a special key was used to remove the bracket securing the Aneroid Capsule.
Now obviously for such an ecclectic timepiece (which was manufactured over fifty years ago) finding the special key was going to be a challenge and so I had to brood on this for a while. I could proceed without the key but there were risks involved. For example, if I damaged any part of the barometer, the altimeter would never work again- replacement parts are not extant. On the other hand, if I waited for the key to show up on eBay or some other antiques site, I might be waiting forever.
Several months passed before the next clue resolved my dilemma. On that day I happened to be perusing the internet for data on both the Bivouc and its sister the Bathy 50 when I stumbled across an advertisement for the Bathy 50. The dealer had uploaded multiple images of the timepiece, including pictures of the movement with the Aneroid Capsule removed. I could see clearly from the images that the capsule itself was in no way fastened to the movement- that meant I would only need to remove the bracket to free the capsule.
Suddenly a light bulb went on; the bracket was threaded! The key was used to loosen the bracket simply by turning it counter-clockwise. I now understood how to proceed.
Sure enough- with a little bit of leverage I was able to unscrew the bracket which came away with the Aneroid Capsule still attached.

Left behind in the case was the FL10032 movement with the Altimeter Mechanism attached.
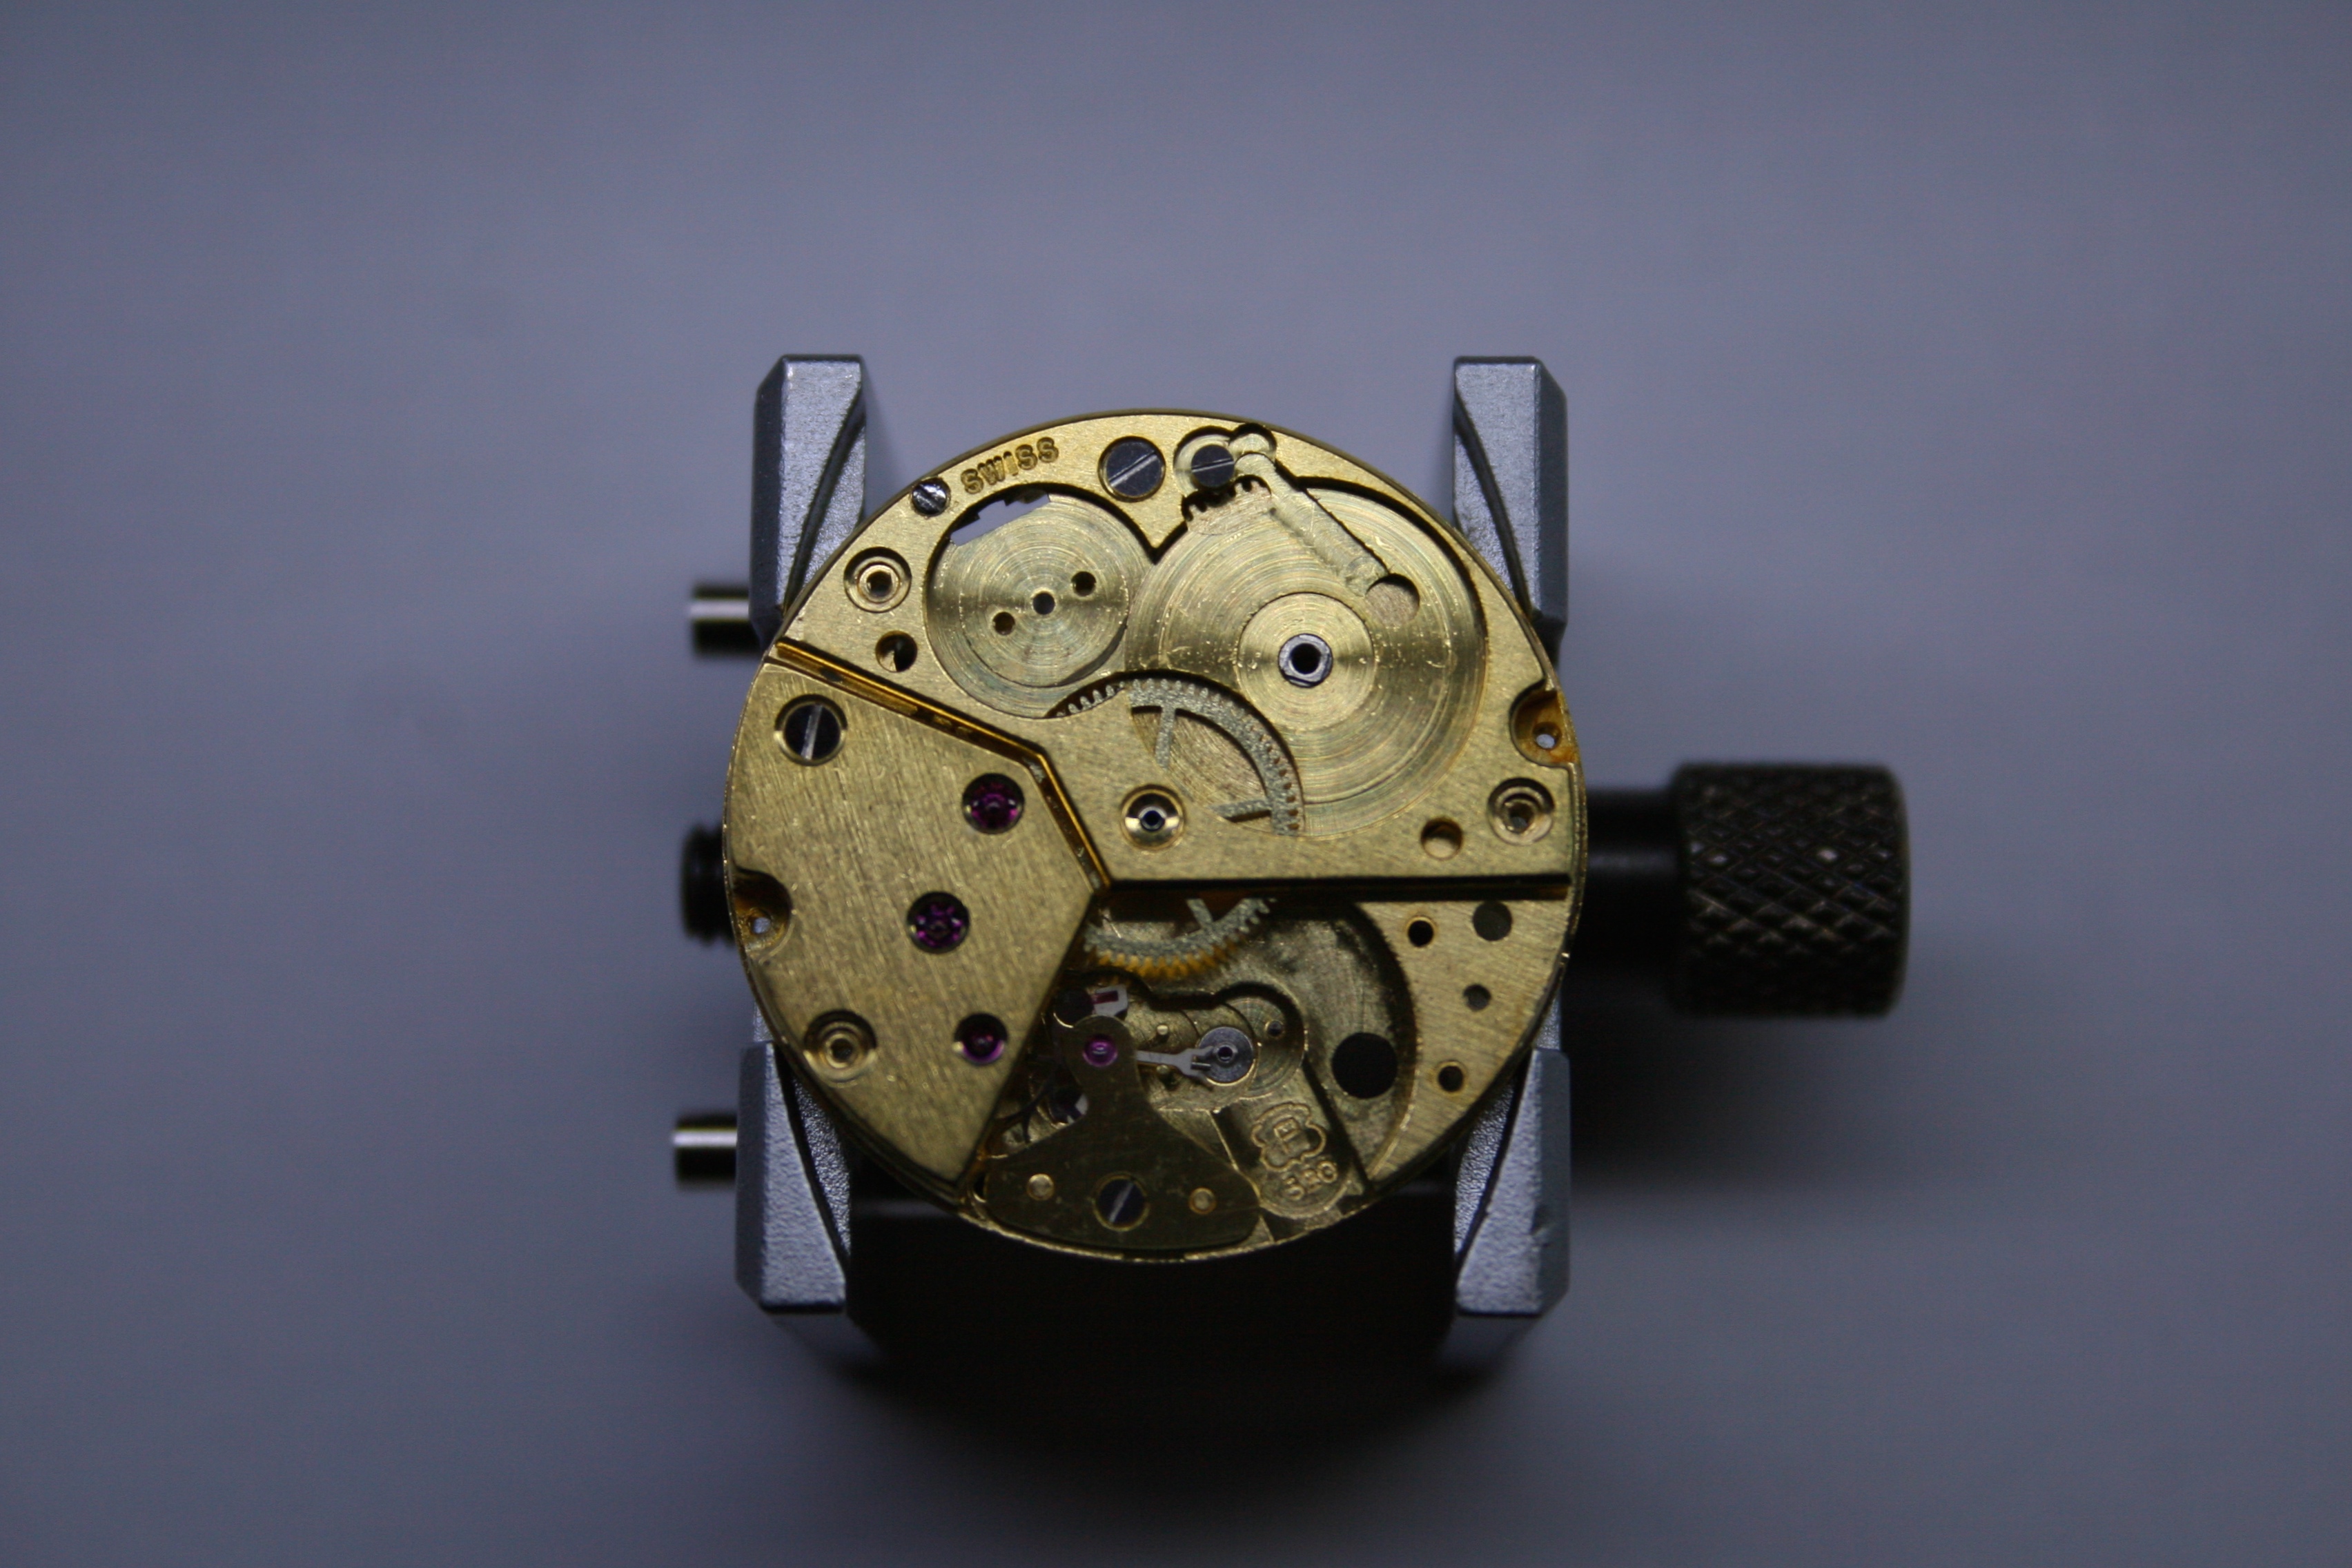
The Altimeter Mechanism was held in place with three bridge screws. I removed these screws the entire mechanism was lifted away.


With that out of the way, I was down to the base movement- which wasn’t functioning so well. As you can see in the image above, the Regulator for controlling the speed of the movement was already pushed to its limit. Despite this, when tested on the Timegrapher, the movement was still running very fast.

A watch running poorly will usually run fast so there was still hope that a proper cleaning would solve the problem.
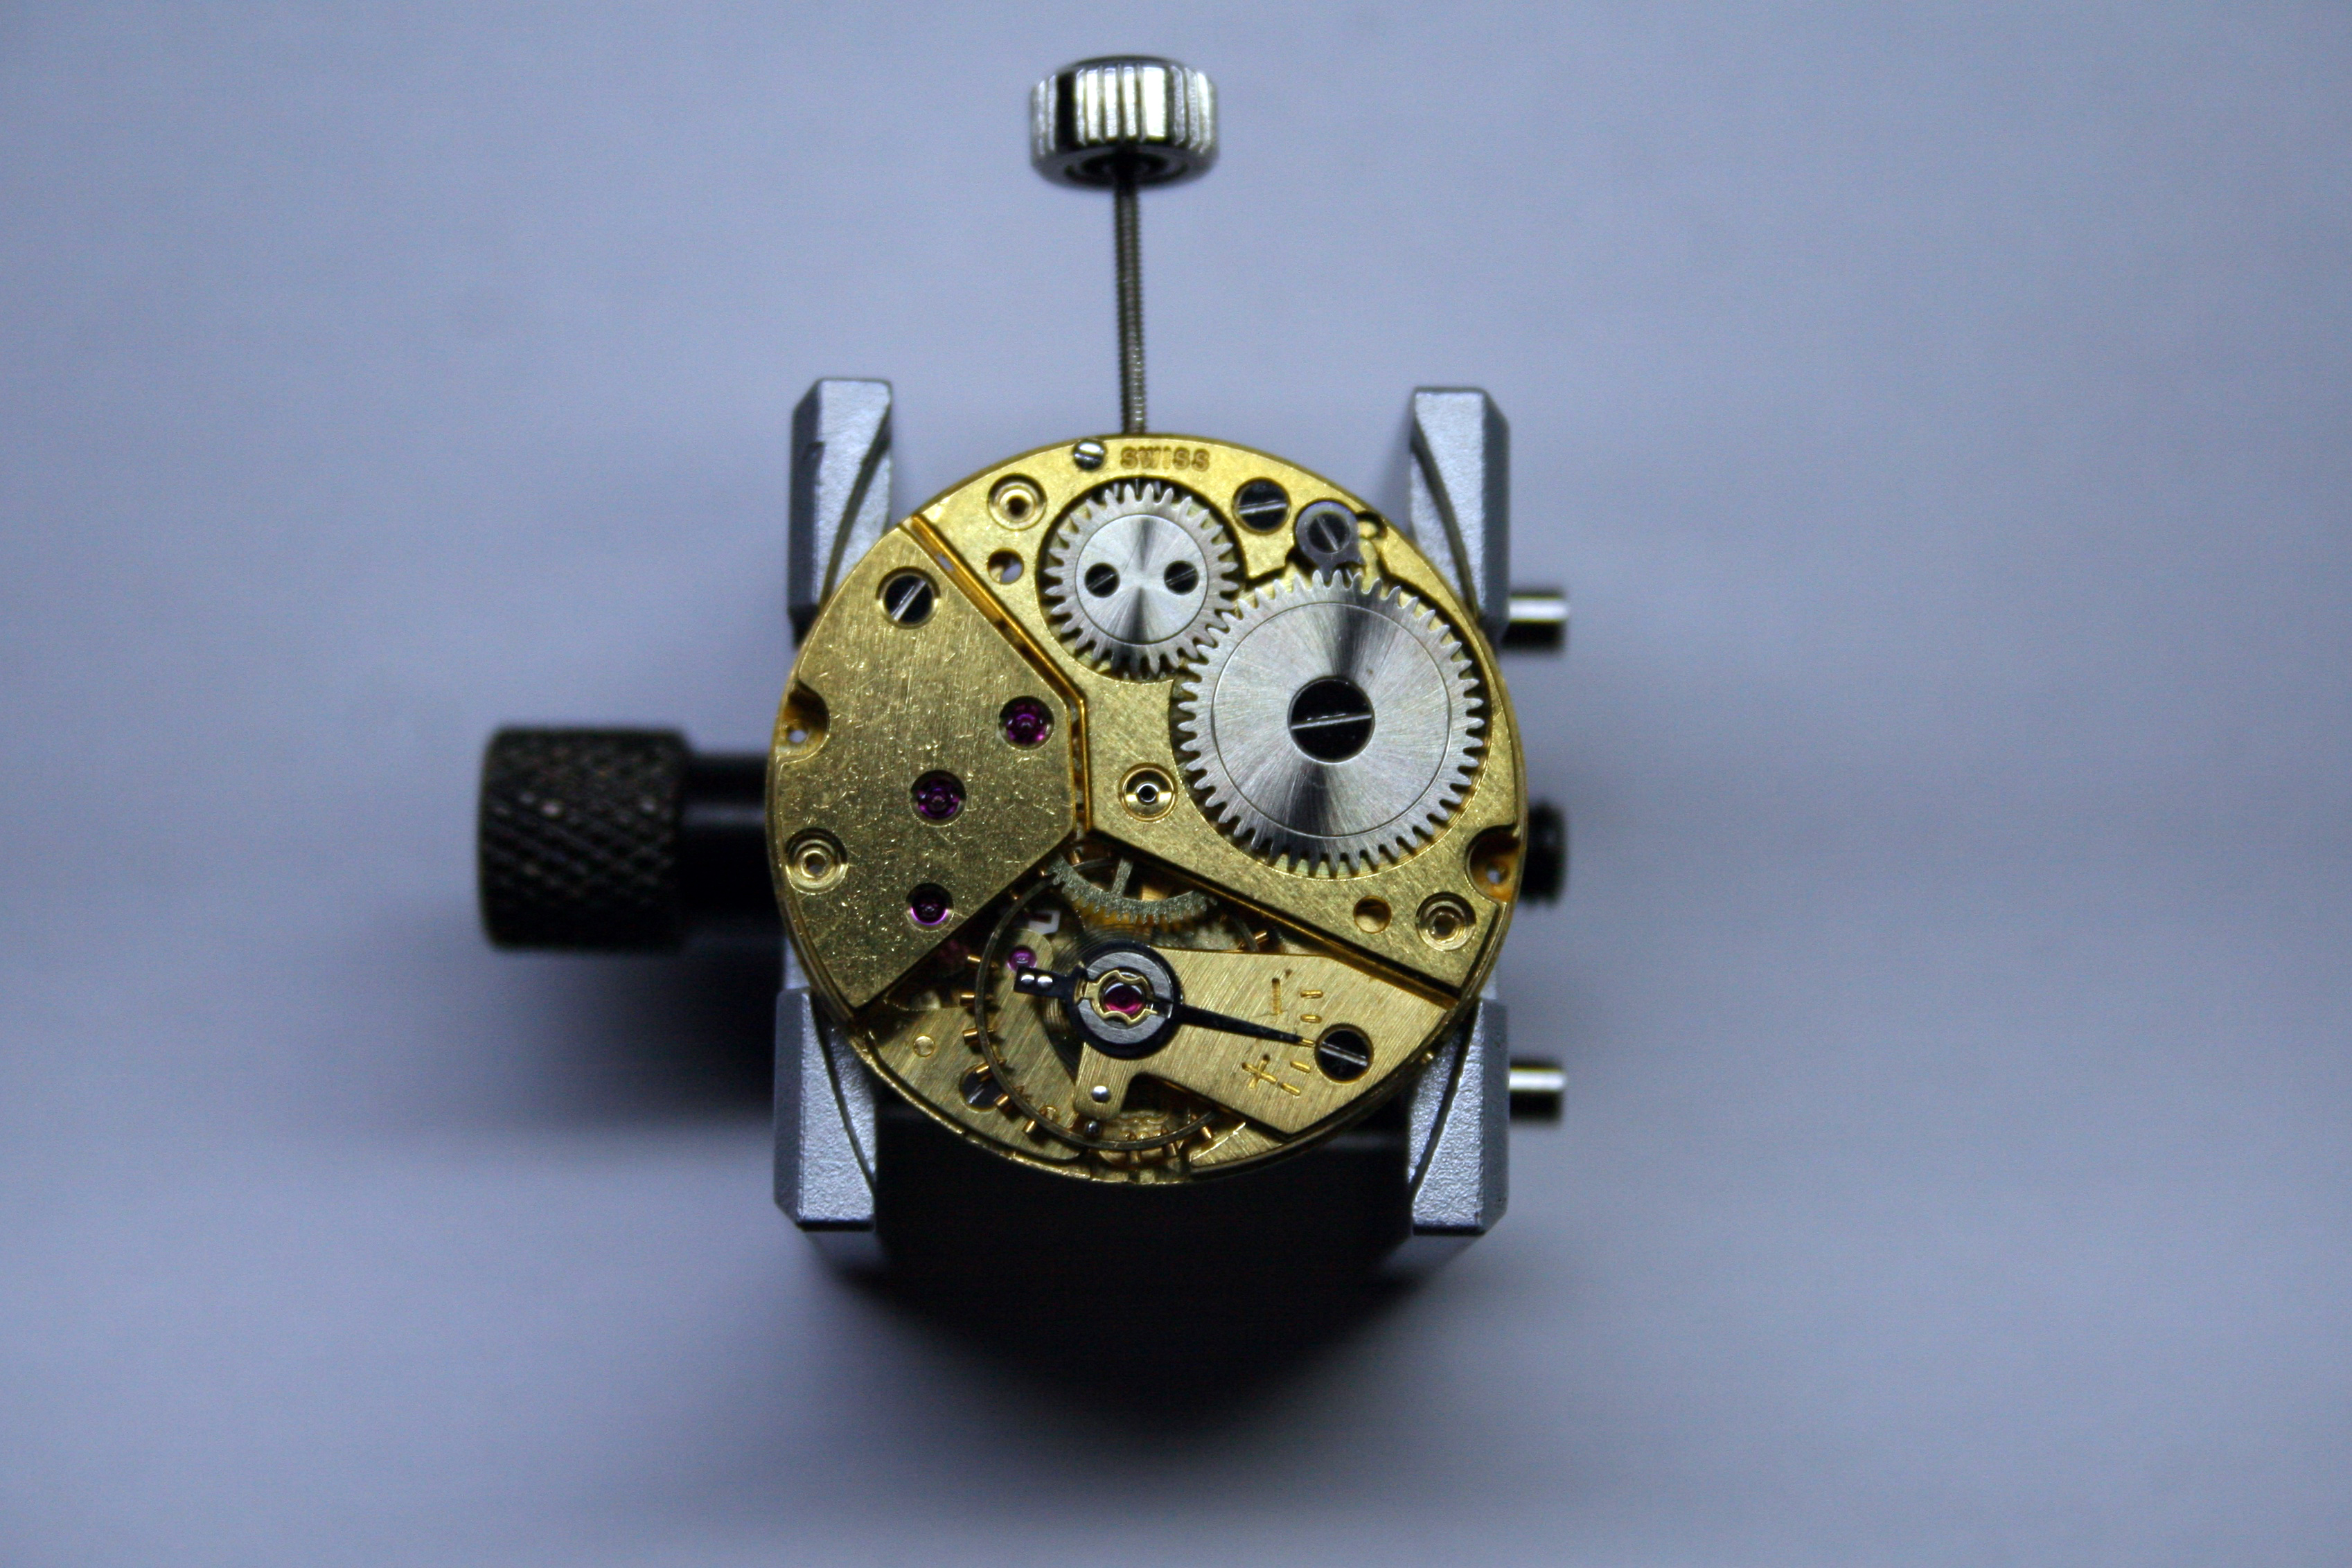
I de-cased the movement and removed the dial; everything seemed to be in good order.

For a large watch (40mm) the movement was pretty small (24mm).

On the underside of the dial I noted the Singer emblem. Most watch enthusiasts probably are not even aware of it, but when you think of beautiful Swiss watches from the 1960’s, you’re probably picturing a Singer dial. You’ll find Singer brand dials in some of the most collectable watches from that period as well- such as my favorite, the Rolex Daytona 6239.
It’s interesting to see how utilitarian the back of a dial is though. The rivets for the hour markers have been ground down so that the dial will sit even and flat. The back of the dial is silver-white like the front but there’s no sunburst pattern here. The dial is not painted- the silver/white color is achieved through an chemical process. The front is coated with a clear varnish which gives the dial it’s sheen. Over time this breaks down and that’s the main reason older dials require restoration.

The movement Favre Leuba used for this watch was a slightly modified Peseux 320 (modified to allow the extended pivot of the Hairspring Pinion to pass through the Center Wheel and Cannon Pinion). The Peseux 320 is a simple hand wound movement with a Swiss Lever Escapement. Other than a touch of rust, there was little of interest to report until I got to the Balance Assembly.

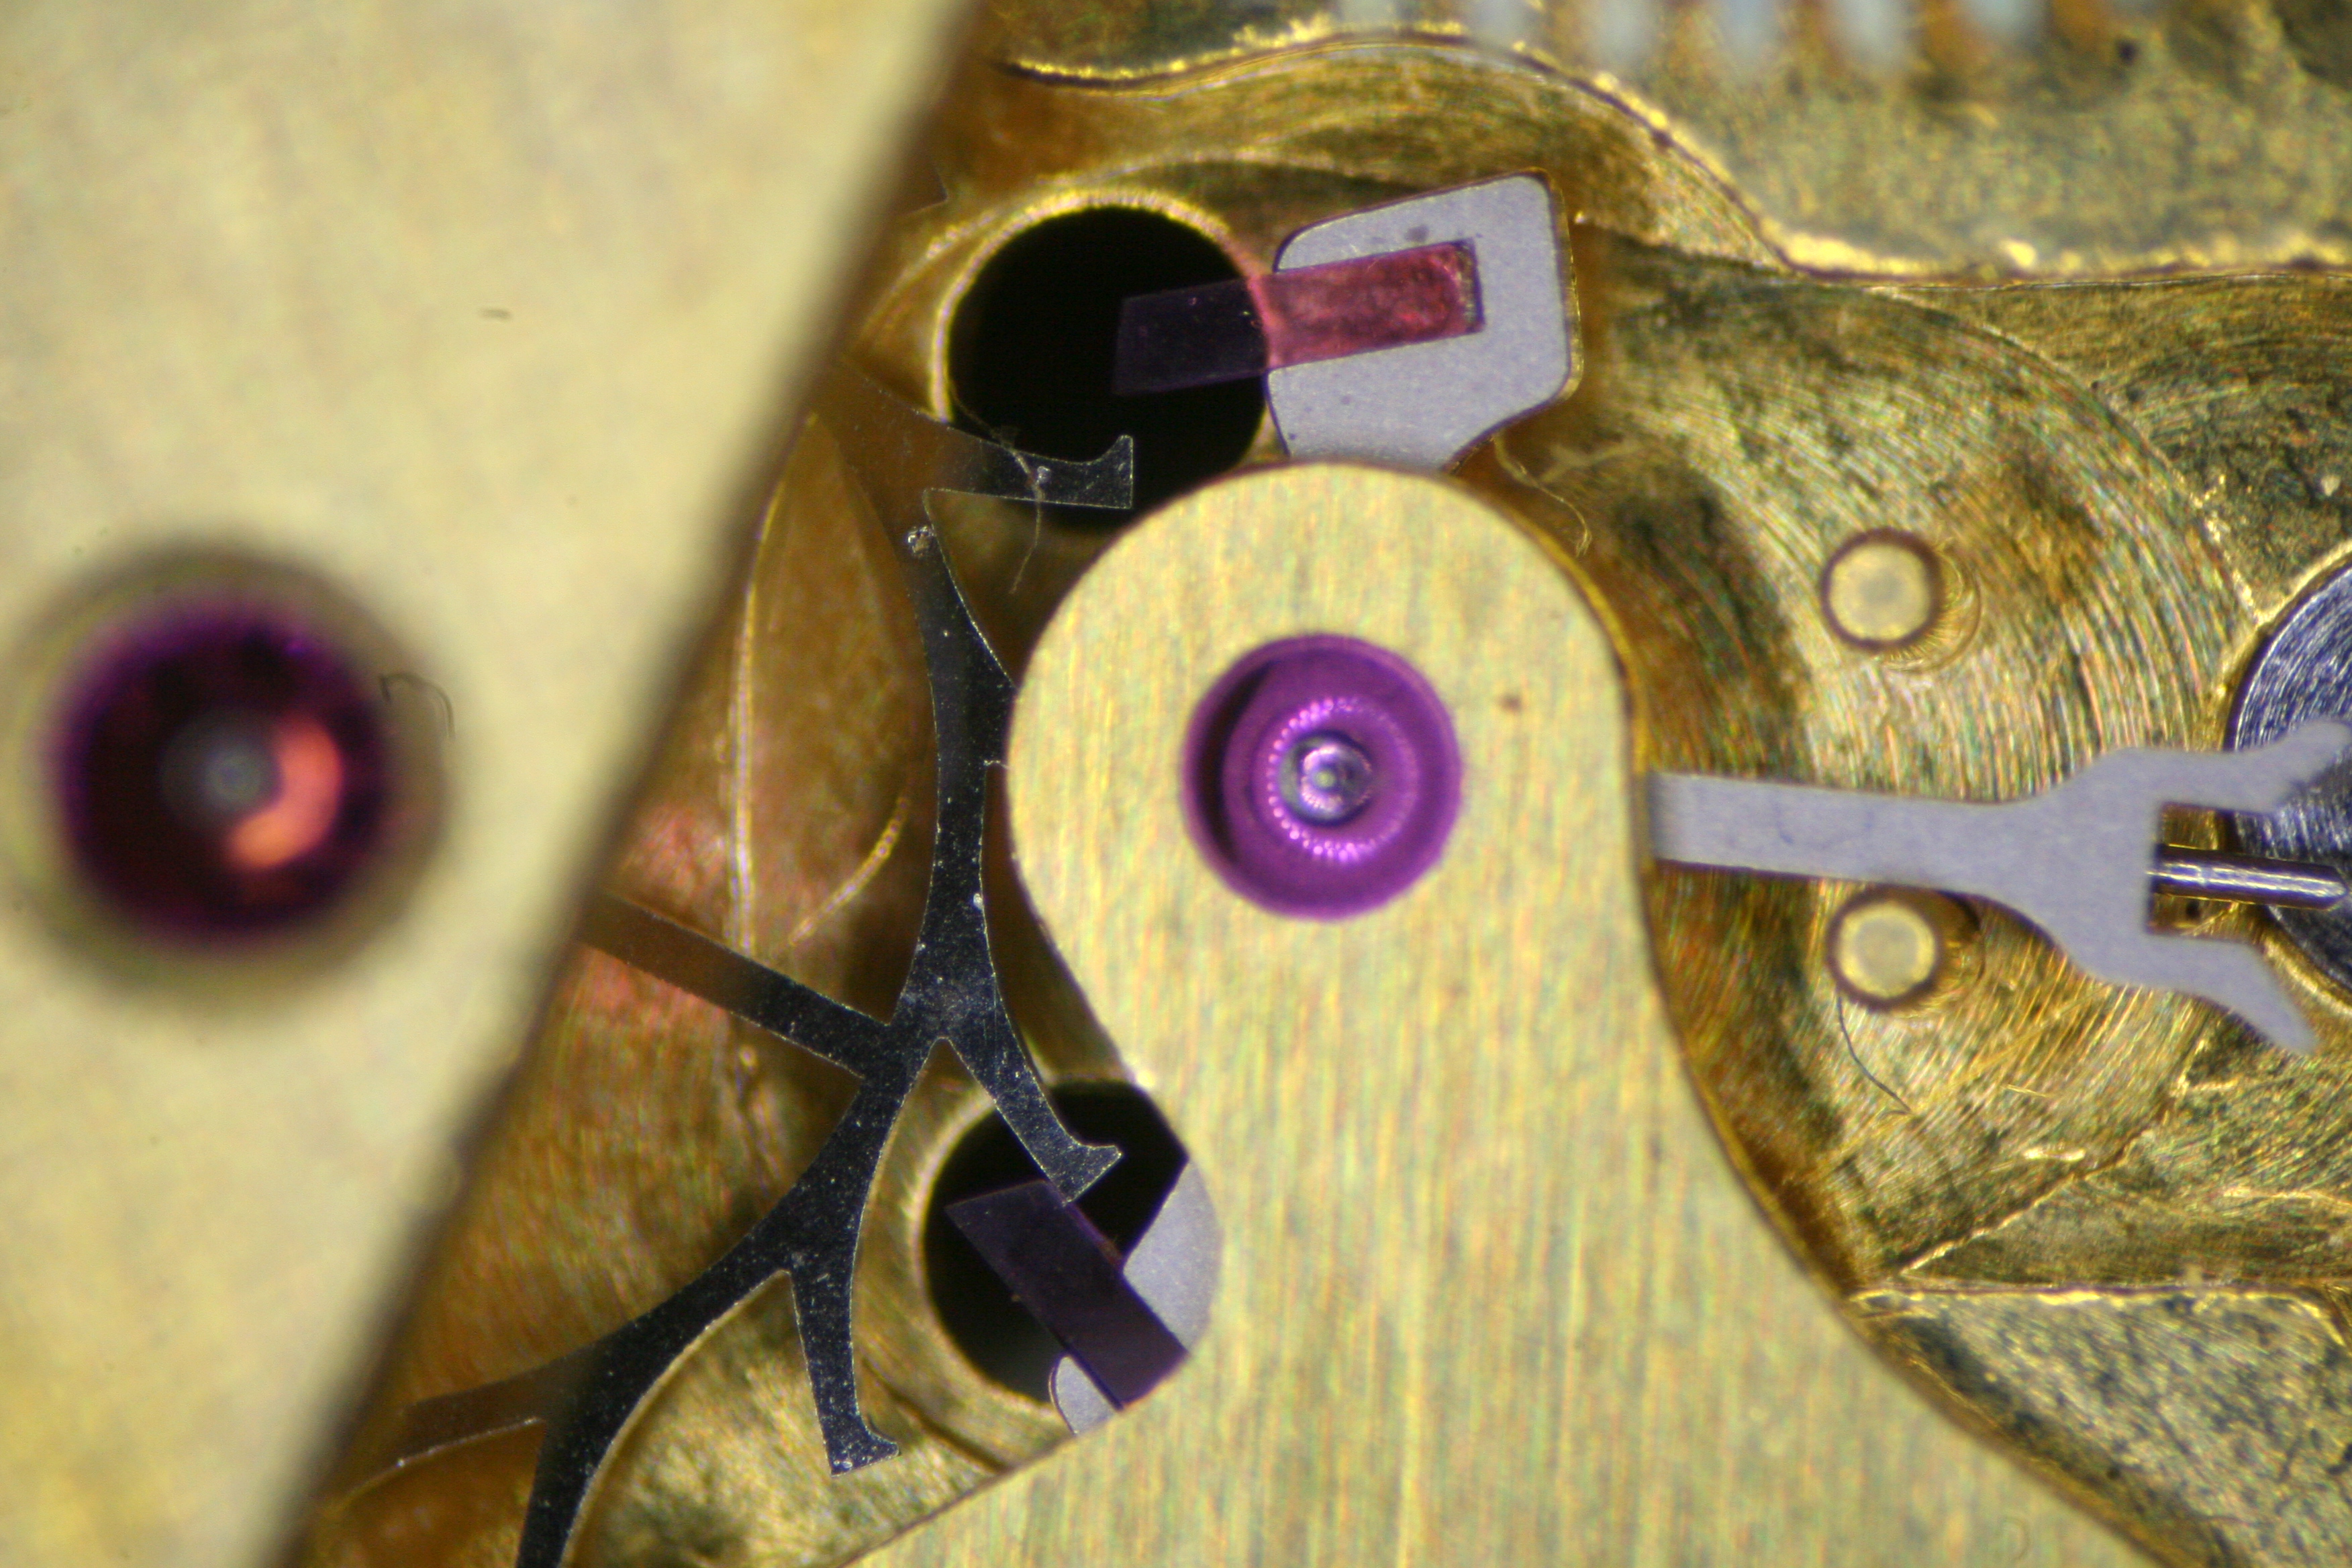

If I had been looking for a reason the watch was running so fast, I didn’t one. I did note however that mass had already been added to the Balance Wheel. Generally you add mass if you are trying to slow the movement down or poise the balance.
Mass is added by removing a Timing Screw from the Balance Wheel and inserting a Timing Washer (a small copper washer) screw before returning it to the wheel. I could see quite clearly under the microscope that at least two had been added already.

The speed a watch movement runs at is controlled by the length of the Balance Spring (Hairspring) and the mass of the Balance Wheel. The shorter the spring, the quicker the Balance Wheel will return to neutral, thus the movement runs quickly. A longer Balance Spring or a Balance Wheel with greater mass results in an increase in the time it takes for the Balance Wheel to return to neutral, in this case the movement runs slowly.
The only option available to slow the speed at which the movement is running is to add mass to the Balance Wheel. This would mean adding more Timing Washers which would certainly take the wheel out of poise. When the Balance Wheel is out of poise, the movement will run fast in one position and slow in another. I found this option to be unpalatable and instead began hunting for a replacement Balance Assembly.
Finding a replacement Balance Assembly for a movement of this age can be a bit of a crap shoot. The watchmaking craft has moved on since this time and the very few of the movements in production in the 1960’s remain in production today. If you can find replacement parts they usually come off a donor movement or are New-Old-Stock replacements. New parts just aren’t manufactured anymore.
Thankfully, in this case finding a replacement Balance Assembly wouldn’t be a problem. Perhaps Peseux 320 movements are common, or more likely there just isn’t a great demand for parts. I found quickly that there were multiple options available through eBay. I settled on a donor movement since it was slightly above the cost of a NOS Balance Assembly but it included the Balance Assembly plus any other parts I might want to change. I would also have access to replacement screws and jewels that I might find useful for other jobs. Best of all the donor movement was running and adjusted to five positions.
I don’t remember if I’ve explained in the past what the term “Adjusted to x positions” means so I’ll give a brief explanation here. The timekeeping accuracy of a watch movement can be tested in up to six positions: dial up, dial down, pendant up, pendant down, pendant left, pendant right. Ideally you want as little variance as possible between the differing positions; perfection is not possible because of the forces of friction and gravity. A very good watch will be adjusted to provide consistent timekeeping in multiple positions. This will require a well poised Balance Wheel, perfectly finished pivots in the Going Train, multiple high quality jewel bearings, and perfect fit in the bearings.
In essence this means the Balance Assembly on the donor movement was certified fresh.
The donor movement arrived and I pulled the Balance Assembly for cleaning. It was a perfect match to the Balance Assembly I pulled from the original movement except this one had the potential to work properly.
I should note that I could have simply swapped out the old movement and replaced it with the donor. The only parts I would need to change to accept the Altimeter Mechanism would be the Cannon Pinion and Center Wheel. The donor movement even had more jeweled bearings than the original movement and cap jewels for the Escape Wheel. So why didn’t I do this? Well, the watch would certainly run better but it also would be a “Franken-watch” which is heavily frowned upon in the collecting community. It’s the equivalent of not having matching serial numbers on your vintage Corvette (or Jaguar E-Type). Replacing parts is one thing, but wholesale replacement of the movement is considered a step too far.

I cleaned all the bits and pieces and commenced with assembly. After working on so many chronographs and automatics, a simple hand-wound movement was welcome change of pace.
I installed the new Balance Assembly and tested the movement on the Timegrapher to see if the result was any better than before and as expected it was. The movement has a new Mainspring in it in addition to the new Balance Assembly and even before adjusting the Regulator (which was already pushed far to the negative position) the Timegrapher displayed a much better trace than before.

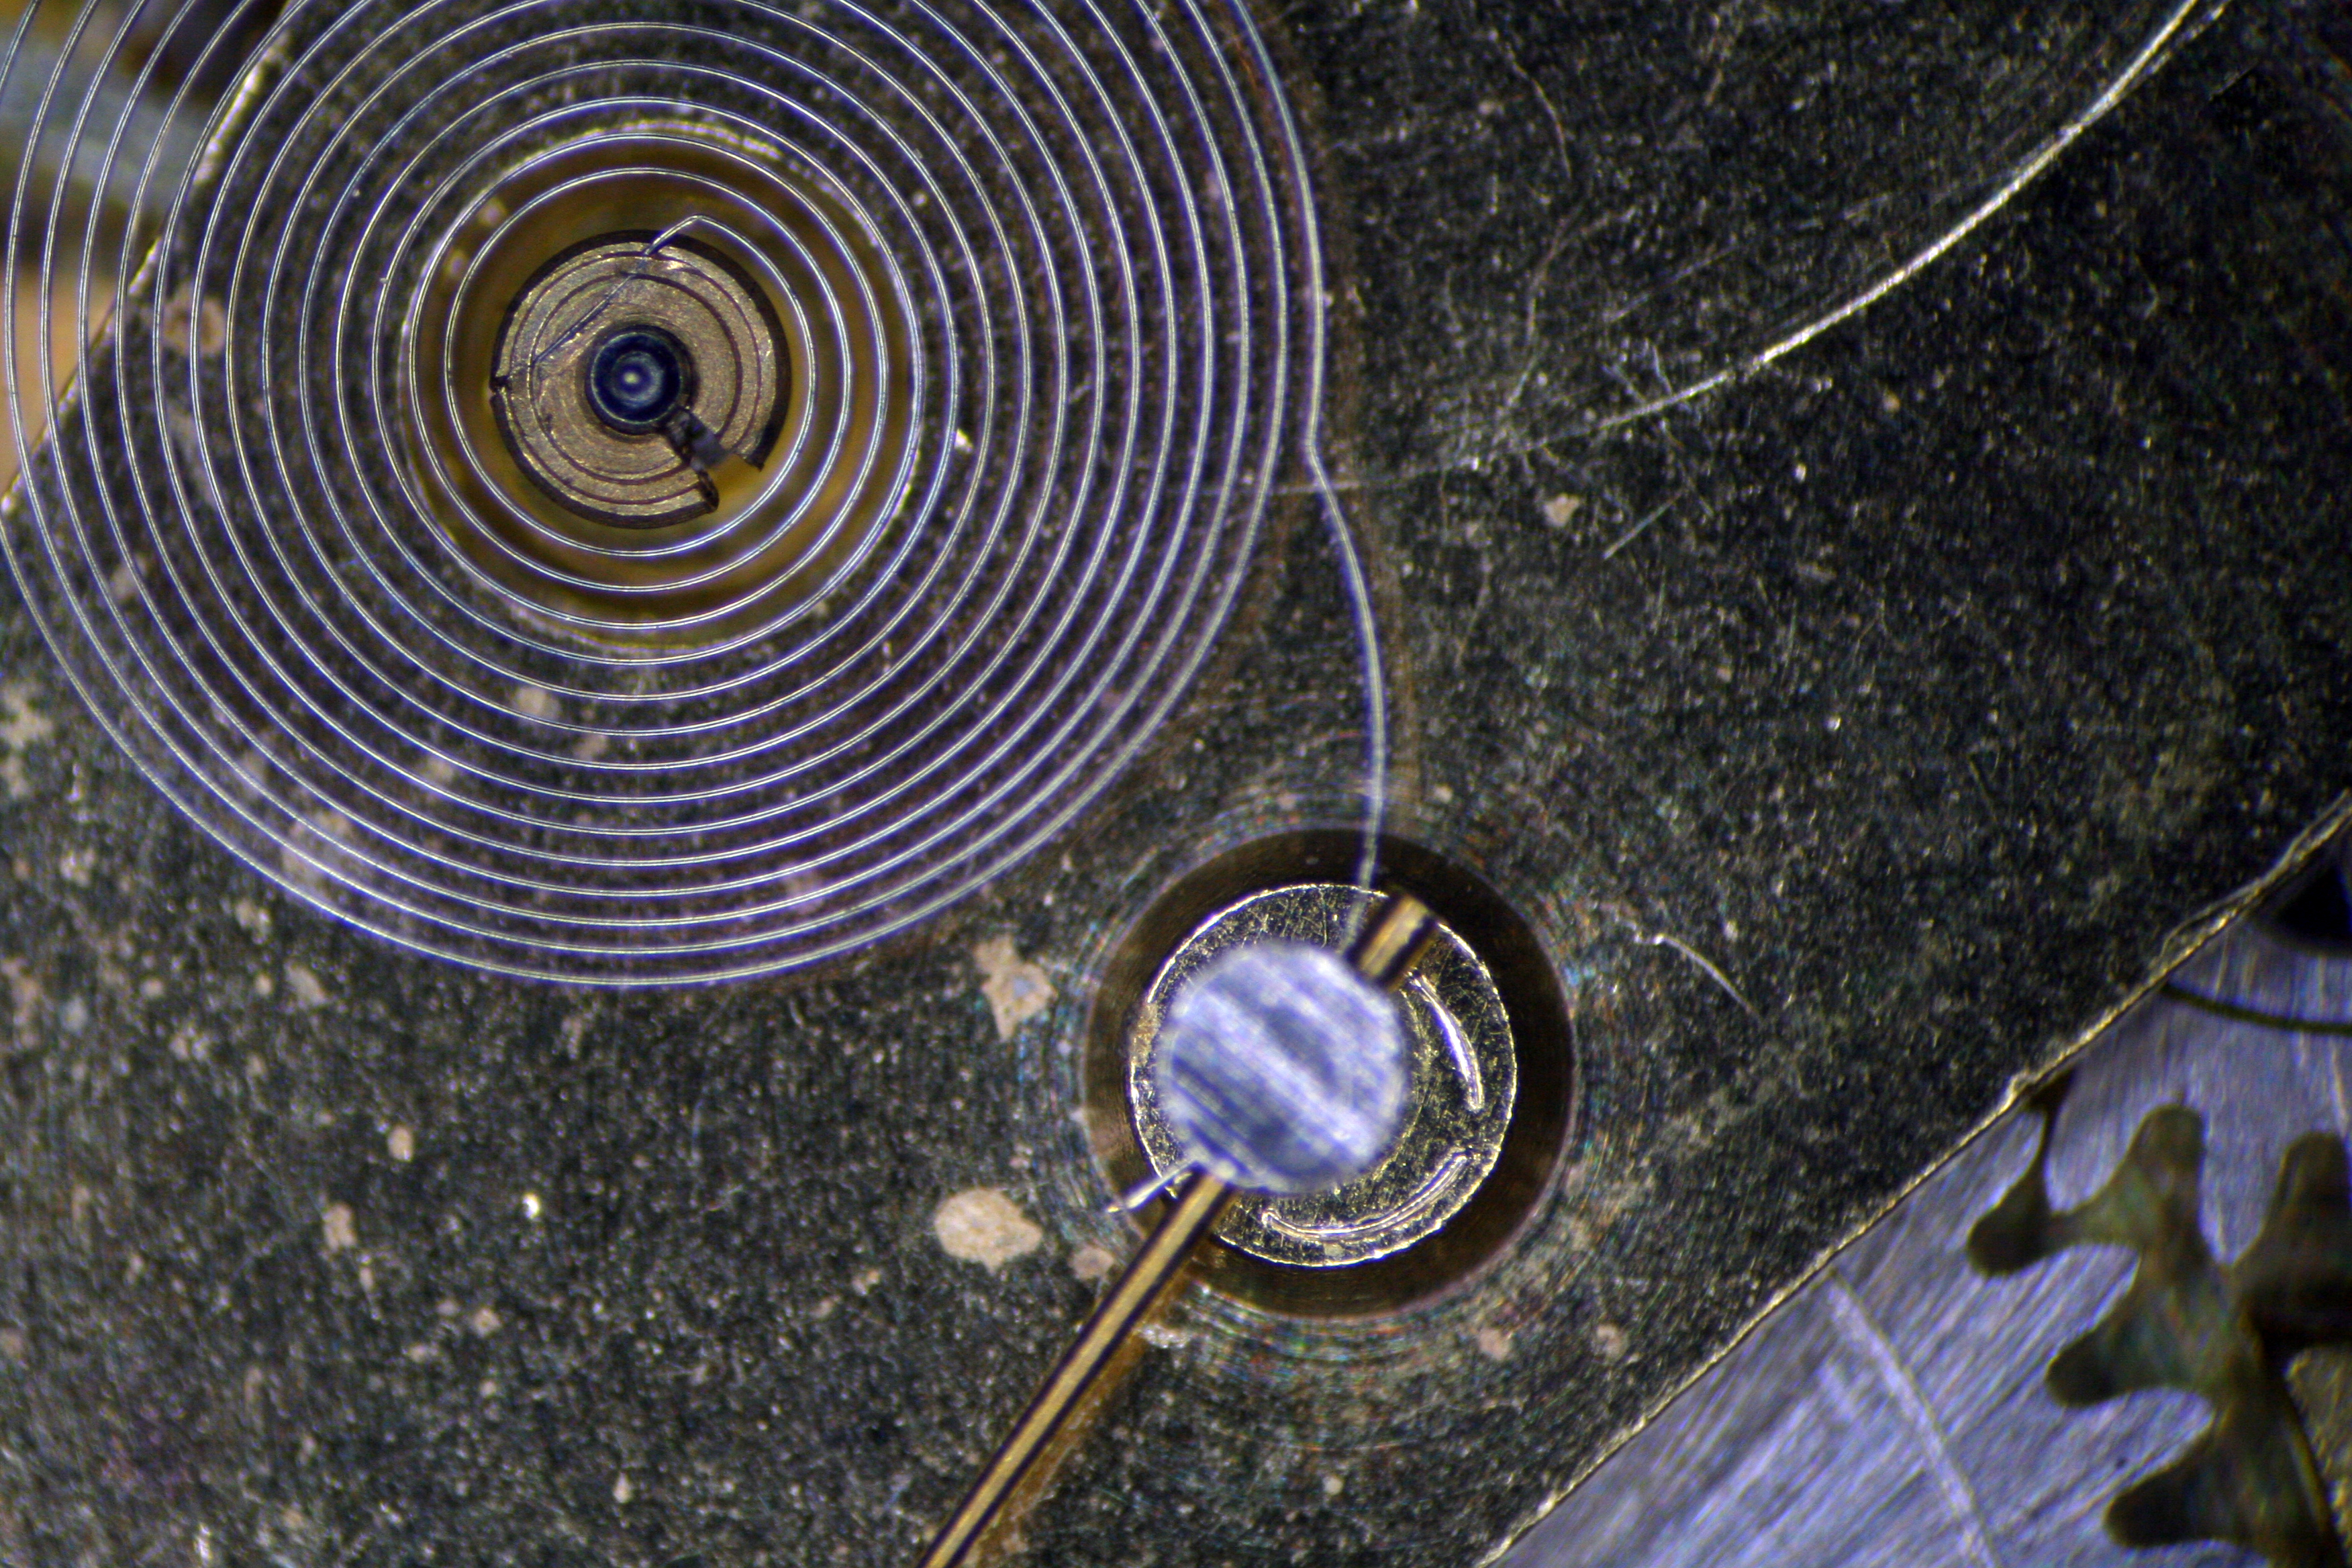
Finally it was time to reassemble the Altimeter Mechanism. Following it’s removal earlier I had disassembled the mechanism and cleaned each of its constituent parts individually.
The Altimeter Mechanism is a relatively simple assembly; the Aneroid Capsule expands and contracts based on atmospheric pressure. Expansion of the capsule results in depression of the Multiplier Lever which in turn acts on the Control Wheel; the Control Wheel turns the up/down movement of the Multiplier Lever into a rotary motion. The Control Wheel turns the Hairspring Pinion onto which is attached the red barometer hand. When pressure increases the Hairspring Pinion turns counter-clockwise and when pressure decreases the pinion turns clockwise.
Assembly of the Altimeter Mechanism was straight forward as I had taken pictures of each part prior to disassembly and I had the service instructions. Getting the adjustment just right took a bit of effort but wasn’t terribly taxing. I did find dealing with two hairsprings in one movement to be a bit nerve racking though!

I was now at the stage where the movement was back together and functioning properly but I was still missing a proper crystal and I wasn’t happy with the condition of the bezel.
There is a little bit of controversy regarding very early Bivouac models as some have plan brass bezels and others have black bezels. My model had the plain brass bezel but I just couldn’t see Favre Leuba selling the watch that way. I did quite a bit of internet sleuthing and came to the conclusion that all early Bivouac models had brass bezels but the bezels were covered with black enamel and the graduated scale was was yellow and white.
As you can see from the picture below, the scale on my bezel was red and white. There doesn’t seem to be any hint of black enamel either.

Under the microscope it appeared red paint was applied sometime later in the life of the watch. The scratches in the brass lead me to believe someone has taken sand paper to the bezel.

Sure enough, a bit of paint stripper confirmed the red paint was placed on top of yellow epoxy resin.
So here’s what I think is really going on. The first generation Bivouac models had a combination brass/steel bezel (the insert being brass). The brass insert was engraved with the graduated scale (elevation in feet or meters), the numbers of the scale being filled with white and yellow epoxy resin. Any exposed brass was covered with gloss black enamel.
Generally when I’m restoring a vintage timepiece I try to keep in mind what collectors will be looking for so that I don’t damage the resale value of the piece. Usually this limits me to a single path. Here I found myself in the enviable position of having two legitimate restoration options available. My preference would be to restore the bezel to its original condition if possible- a black enamel bezel with white and yellow numerals. However, a second option would be a plain brass bezel since these are considered acceptable by the collector community.
To restore the bezel to its original condition, I began by stripping any remaining paint or enamel and using a small oiler to remove the white and yellow resin from the engraved numerals.

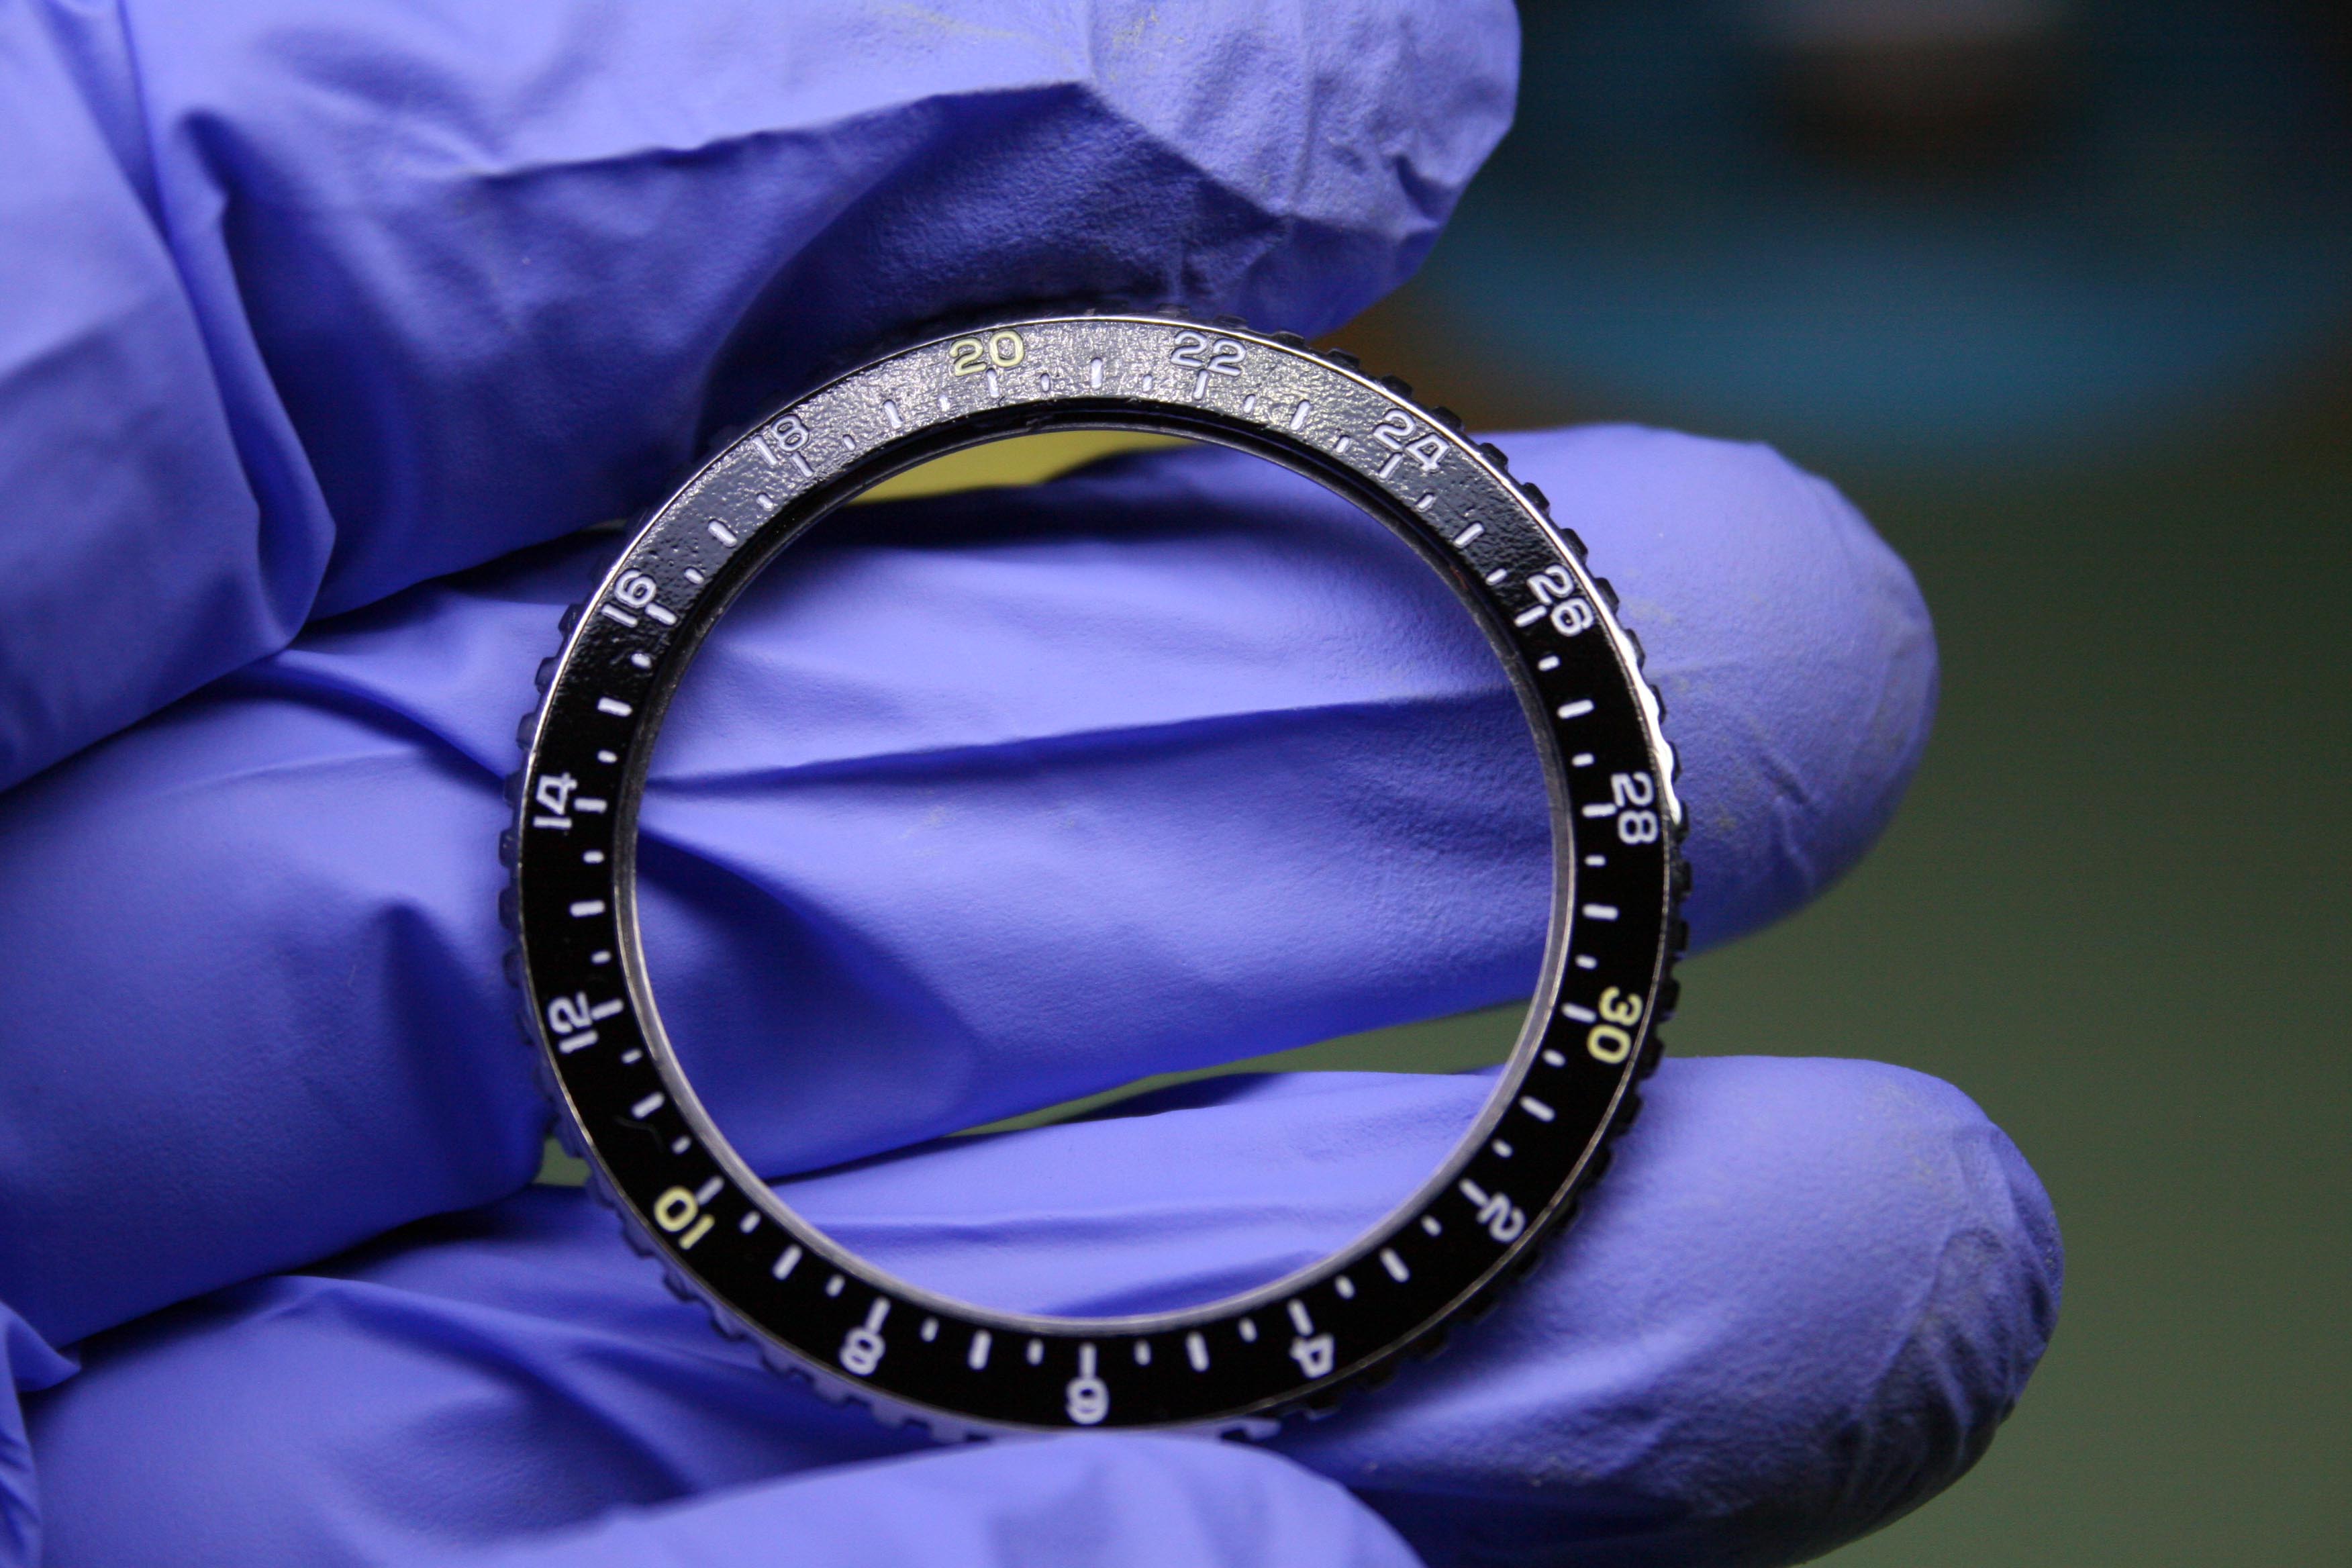
That was the easy part. The hard part was putting the enamel back on! It took six tries to get the bezel right, using many different methods of priming, painting, sanding, etc. In the end I think it’s just about perfect.
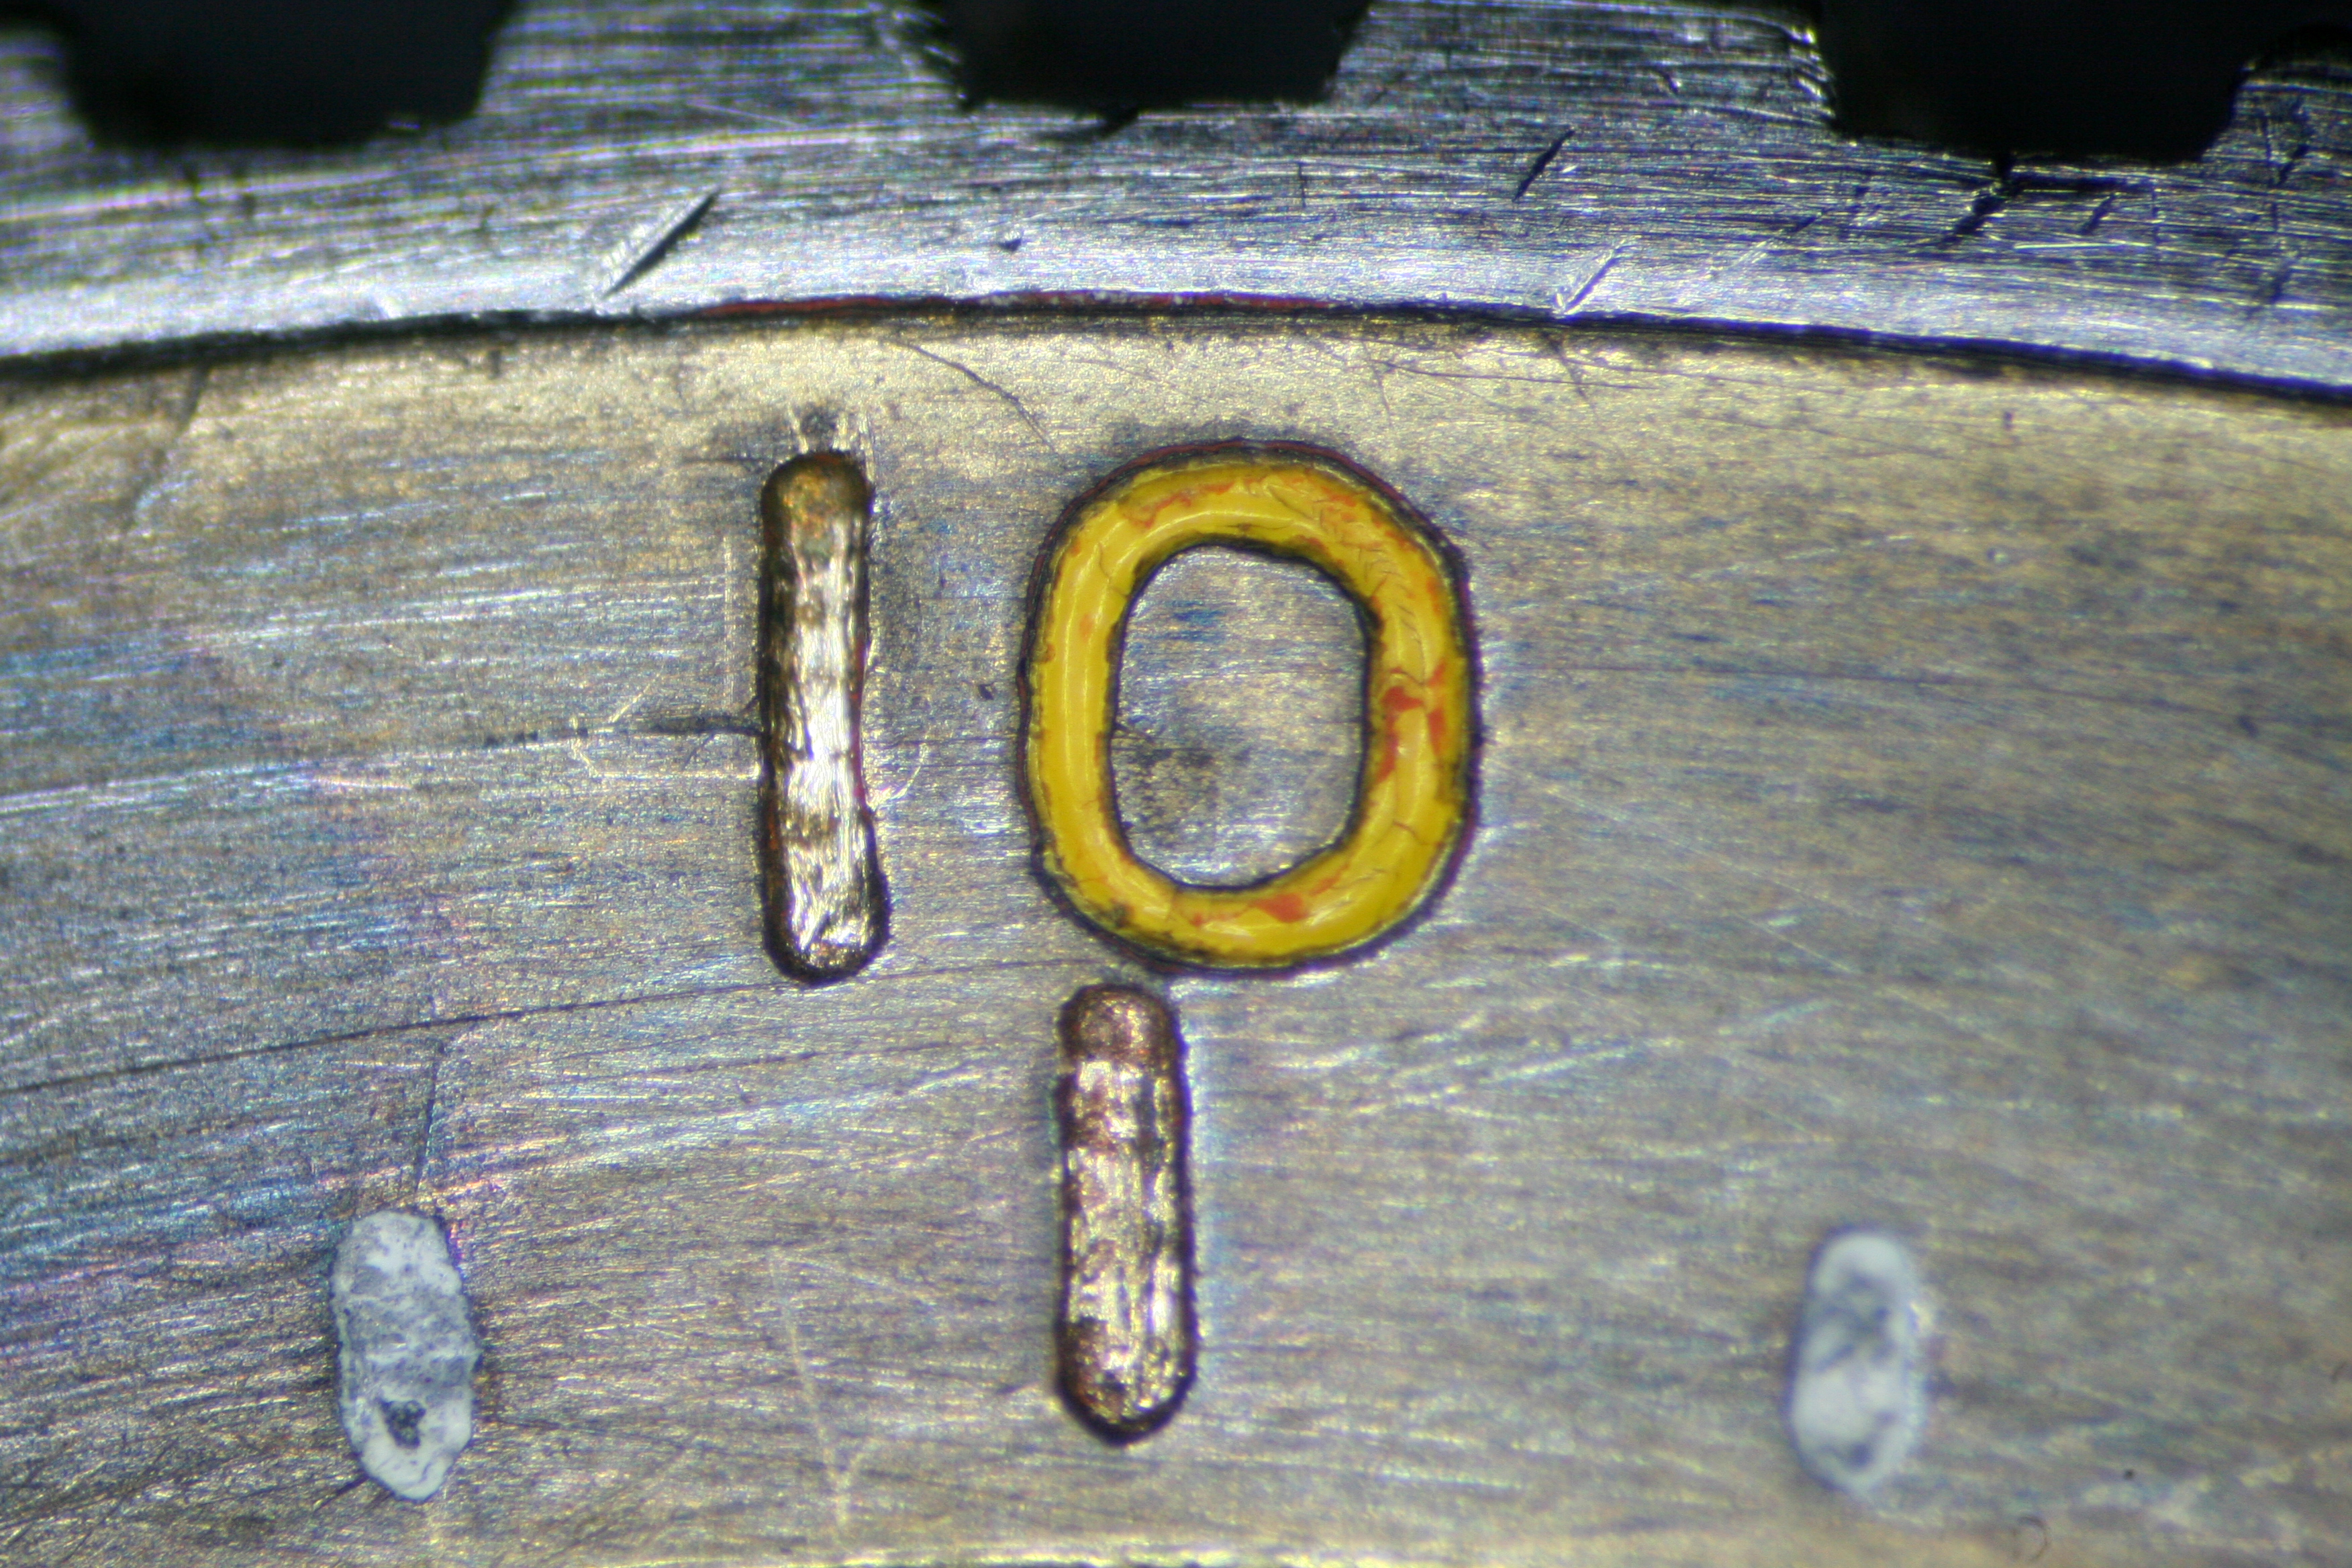
The brass insert has been primed and painted with a gloss black enamel. Each number on the scale was filled in with white or yellow (for the 10, 20, and 30 markers) epoxy resin. Initially I tried enamel for the numerals but found it too unforgiving. The epoxy resin seems to be very close to what was used originally.
The bezel fit nicely but from the Omega Forum I discovered that I was missing the Bezel Click.
Initially I had believed that the Bezel Click Spring functioned as both the Bezel Click and Bezel Click Spring (that it was dual functional) but this was not so. A replacement Bezel Click would be impossible to find and I knew i would need to fabricate one.
I started by creating a prototype out of brass using the image of the Bezel Click Spring posted on the Omega Forum. Once the dimensions proved correct I scribed the outline of the brass prototype on some 22 gauge stainless steel sheet metal. A 0.90mm hole was drilled for the pivot and the excess metal removed to create the part.

A bit of fine tuning was done with an assortment of files to get the fit just right.
Coincidentally a seller popped up on eBay who was offering acrylic crystals which fit the Favre Leuba Sea Sky chronograph which was sold around the same time as this Bivouac. The Sea Sky has an almost identical case and bezel arrangement as the Bivouac so I figured the crystal might be a fit. It turns out it was just a hair large but I was able to turn the edge down on the lathe just enough to get a snappy fit.
I tidied up the dial and replaced the hour and minute hands. A new barometer hand was acquired as the one that came to me with the watch was incorrect.
I reset the bezel and snapped on the the crystal- the fit was nice and tight and the bezel moved freely. Joy!

The very last step of the process was to add the correct stainless steel bracelet to the watch. I’ve been trying to add period correct bracelets to each piece I restore and was lucky enough to score a proper Favre Leuba bracelet. The bracelet fits like a glove.

This restoration was a long term project. It began when I purchased the Bivouac in October of 2016 and only just ended this week. In between there were quite a few setbacks and a lot for me to learn.
At some point down the road I would love to pair a Bathy 50 with the Bivouac. The Bathy Depth Mechanism is almost identical to the Bivouac except that a rubber seal has been added to keep water from entering the movement. Both watches look fantastic and not at all out of place today.
Lastly, I should mention that the Barometer works just fine too. I’ve watched it go up and down throughout the seasons as I’ve worked on this project. It’s reading just a hair high right now but has generally been within a few millimeters of accuracy when checked against the weather service. Living in California, whenever I saw a dramatic drop I automatically assumed there to be some problem- not so, we had a lot of storms this past winter!

Dear sir,
Great article – I have the same watch with the wrong barometer hand – could you advise where you managed to locate the correct one ?
Kind regards
Will
LikeLike